FPV Beginner Setup Guide: The Easiest Way to Get Flying
A beginner-first walkthrough of the FPV starter stack, the order to buy gear, and the safest way to get ready for a first flight.
FPV Beginner Setup Guide: The Easiest Way to Get Flying
FPV Beginner Setup Guide: RTF, BNF & DIY Options Explained
Ever watched exhilarating FPV drone footage and dreamed of flying like that, only to be met with a wall of jargon, endless components, and confusing choices? You're not alone. The world of FPV (First-Person View) can seem daunting for newcomers, but it doesn't have to be. This guide is your personal co-pilot, designed to cut through the complexity and provide a clear, 'overwhelm-free' path from curiosity to your first thrilling flight.
The FPV Journey Begins: Demystifying Your First Setup
Welcome to the World of First-Person View
FPV, or First-Person View, is an immersive drone flying experience where you see what the drone sees through a camera mounted on its front, transmitted directly to goggles worn over your eyes. Unlike traditional camera drones that you fly by watching the drone itself, FPV puts you right in the cockpit, offering an unparalleled sense of speed, agility, and freedom. It's a captivating hobby that blends technical skill with exhilarating aerial acrobatics, from high-speed racing to graceful cinematic flights.
Why This Guide is Your Flight Plan
The initial hurdle for many aspiring FPV pilots is simply knowing where to start. There's a vast array of equipment, different ways to get into the hobby, and a steep learning curve if approached incorrectly. This guide is built on the promise of an 'overwhelm-free' introduction. We'll break down the essential gear, explain the different entry points – Ready-To-Fly (RTF), Bind-N-Fly (BNF), and even a basic DIY approach – and walk you through the crucial pre-flight steps. Our goal is to equip you with the knowledge to make informed decisions and ensure your journey from unboxing to first flight is as smooth and enjoyable as possible.
Navigating the RTF, BNF, and DIY Paths
Before diving into specific components, it's essential to understand the three primary ways beginners typically enter the FPV world:
- Ready-To-Fly (RTF) Kits: These are all-in-one packages that include everything you need to start flying, often pre-bound and configured.
- Bind-N-Fly (BNF) Drones: These kits include just the drone, requiring you to purchase your own compatible radio transmitter and FPV goggles separately.
- The DIY Route: This involves sourcing individual "FPV drone components explained" like frames, flight controllers, motors, ESCs, FPV cameras, and VTXs, and assembling them yourself.
Each path has its own advantages and disadvantages, catering to different comfort levels, budgets, and desires for customization. This guide will help you choose the best fit for you.
Decoding the FPV Ecosystem: Essential Components Explained
Understanding the core components of an FPV system is crucial, regardless of whether you buy an RTF kit or build your own. These are the fundamental "what do I need for FPV" items.
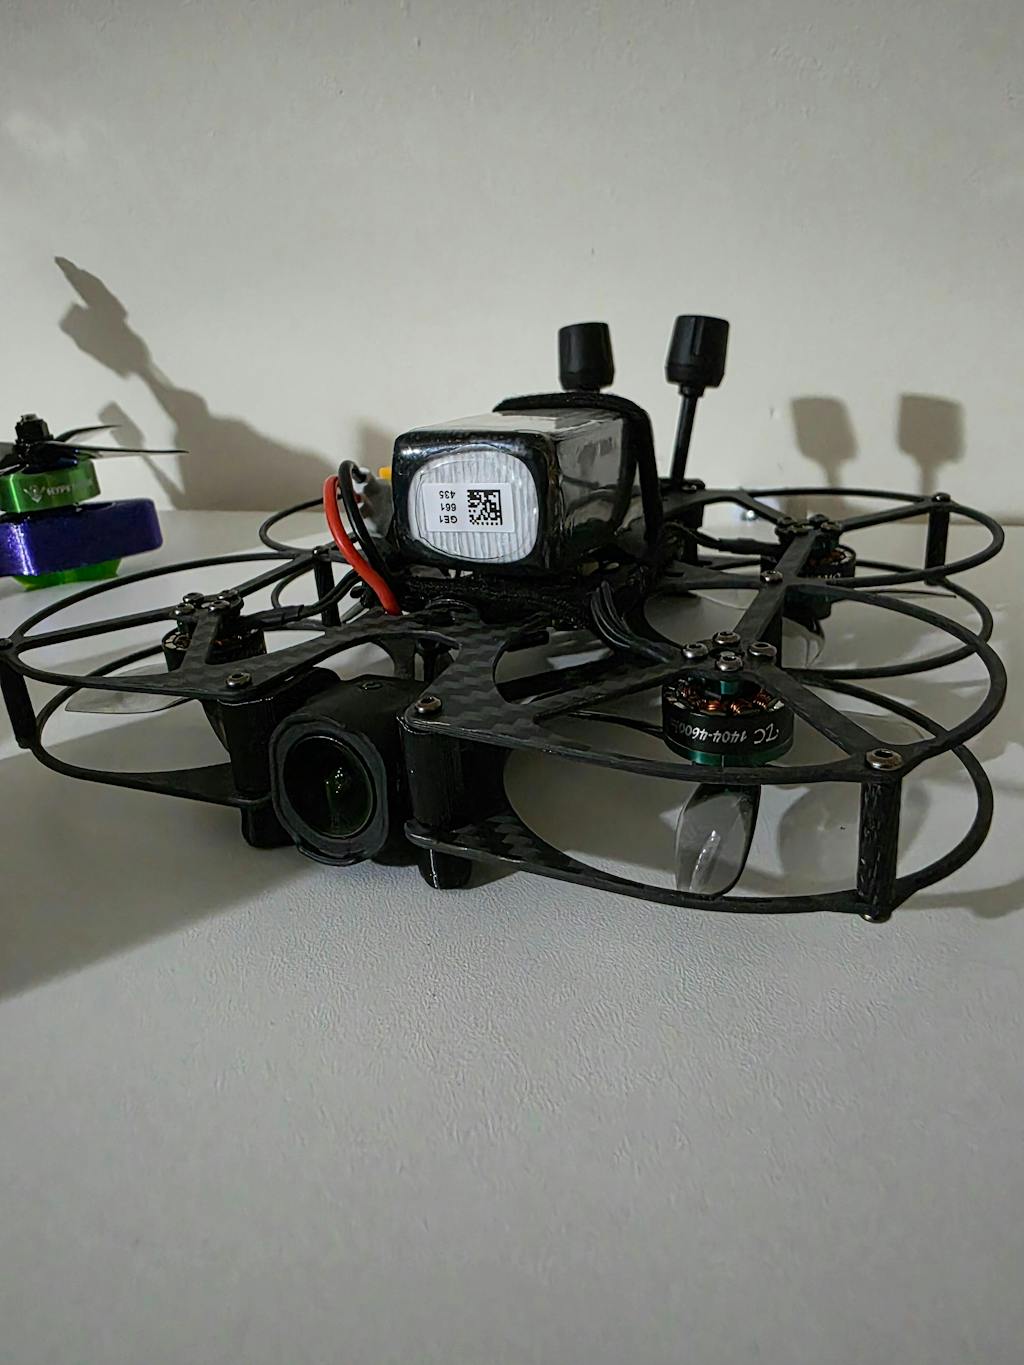
The FPV Drone: Your Eyes in the Sky
At its heart, an FPV drone is a marvel of engineering designed for agility and speed. The primary components include:
- Frame: The skeleton of the drone, holding everything together. Frames come in various sizes and materials (carbon fiber is common for durability). For beginners, smaller, more durable frames are often recommended.
- Motors: Electric motors (usually brushless) that spin the propellers. The size and KV (kilovolt) rating determine speed and power.
- ESCs (Electronic Speed Controllers): These are the brains for the motors, translating signals from the flight controller into motor speed. Modern drones often integrate multiple ESCs into a single 4-in-1 board.
- Flight Controller (FC): The central processing unit of the drone, running firmware like Betaflight, EmuFlight, or ArduPilot. It takes input from your radio, gyroscope, and accelerometer to stabilize and control the drone.
- FPV Camera: A small, lightweight camera that captures the real-time video feed.
- VTX (Video Transmitter): Transmits the FPV camera's video feed wirelessly to your FPV goggles.
- Receiver (RX): Communicates with your radio transmitter, receiving your control inputs.
FPV drones come in many sizes. For beginners, Tiny Whoops (65mm-75mm, like the Mobula6 or Eachine E016F) are excellent for indoor flying due to their ducted propellers and light weight. Toothpick drones (around 85mm-120mm, such as the GEPRC Skip3 HD or Emax Tinyhawk Freestyle) offer more outdoor capability while remaining relatively small and durable. Larger 5-inch drones (like the Emax Hawk 5) are standard for racing and freestyle but are generally not recommended for absolute beginners due to their power and speed.
FPV Goggles: Your Window to the World
FPV goggles are perhaps the most defining piece of equipment for the FPV experience. They display the real-time video feed from your drone, creating that immersive first-person perspective.
- Box Goggles: Larger, often cheaper, and offer a wide field of view. Examples include the Eachine EV800D. They're a great entry point for "cheap FPV setup" as they provide a decent image for their price.
- Compact Goggles (FatShark style or modern digital systems): Smaller, more portable, and often offer higher resolution and advanced features. These are typically more expensive.
You'll also encounter analog vs. digital FPV systems. Analog is the traditional, more affordable option, offering low latency but a grainy, often static-filled image. Digital systems, like the DJI digital FPV system or HDZero/Walksnail Avatar, offer a crystal-clear, high-definition image with incredibly low latency, but come at a significantly higher cost. For beginners, analog is often the most accessible entry point due to its cost-effectiveness and widespread compatibility.
Radio Transmitter: Your Command Center
Your radio transmitter (or controller) is how you communicate with your drone, sending commands for throttle, pitch, roll, and yaw.
- Modes: Most pilots fly in Mode 2 (left stick for throttle and yaw, right stick for pitch and roll) or Mode 1 (left stick for throttle and pitch, right stick for roll and yaw). Mode 2 is dominant in many regions, including North America and Europe.
- Gimbals: The sticks on your radio; hall effect gimbals are preferred for their precision and durability.
- Protocols: The language your radio uses to talk to your drone's receiver. Popular protocols for FPV include ExpressLRS (ELRS), FrSky (ACCST, ACCESS), Crossfire (TBS), and Ghost (ImmortalRC). ExpressLRS is rapidly becoming the standard due to its excellent range, low latency, and open-source nature, making it a highly recommended choice for beginners.
Good beginner radios include the Radiomaster Zorro or Jumper T-Pro, offering multi-protocol support and ergonomic designs.
Batteries & Charger: The Lifeline of Your Flight
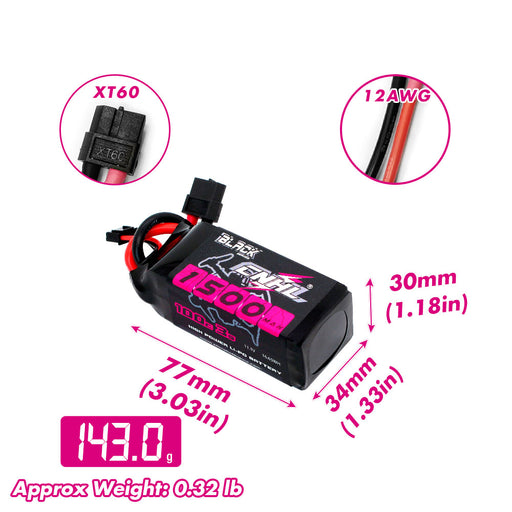
FPV drones are powered by LiPo (Lithium Polymer) batteries, which are incredibly powerful but require careful handling.
- 'S' (Series): Refers to the number of cells in series. A 1S battery has one cell, a 4S battery has four cells (typically 14.8V nominal voltage). Higher 'S' numbers mean more voltage and power. Beginners often start with 1S or 2S for Tiny Whoops, moving to 3S or 4S for larger drones.
- mAh (milliampere-hour): Indicates the battery's capacity. Higher mAh means longer flight times but also more weight.
- 'C' (Discharge Rate): Represents how quickly the battery can safely discharge its power. A higher 'C' rating is needed for power-hungry FPV drones.
A proper LiPo charger is absolutely essential. These are not simple phone chargers; they balance the voltage across each cell to ensure safety and prolong battery life. Examples include the ISDT Q6 Nano or ToolkitRC M6D. Always charge in a fire-safe location and never leave charging batteries unattended.

Choosing Your Entry Point: RTF, BNF, or DIY?
Deciding how to get your "first FPV drone kit" is a critical step. Each option caters to different needs and skill levels.
Ready-To-Fly (RTF) Kits: Instant Gratification
What it includes: An RTF kit is the ultimate "beginner FPV drone kit" solution. It typically comes with a fully assembled drone, FPV goggles, a radio transmitter, batteries, and a basic charger. Everything is pre-bound and configured, meaning you can often charge the batteries and fly almost immediately.
Pros:
- Easiest Start: Minimal setup required, perfect for absolute beginners.
- Everything Included: No need to research individual components or compatibility.
- Lower Initial Cost (often): While not always the cheapest long-term, the upfront cost can be attractive for a complete package.
Cons:
- Less Customization: You're limited to the components provided.
- Potentially Lower Quality Components: To keep costs down, some RTF kits might include less durable or lower-performance parts.
- Limited Upgrade Path: The radio or goggles might not be suitable for future, more advanced drones.
Ideal for: Absolute beginners who want to experience FPV with the least amount of technical hassle. Excellent examples include the Eachine Novice-III series or the BetaFPV Cetus X kit, which offer durable drones suitable for learning.
Bind-N-Fly (BNF) Drones: The Next Step Up
What it means: A BNF drone comes fully assembled but without a radio transmitter or FPV goggles. You "bind" it to your existing, compatible radio. This option assumes you already own or are willing to invest in a separate radio and goggles.
Pros:
- More Choice in Peripherals: You can select a higher-quality radio and goggles that will serve you well for future drones.
- Often Better Quality Drones: BNF drones typically offer better performance and durability than those found in entry-level RTF kits.
- Cost-Effective if You Have Gear: If a friend already flies FPV and you can borrow their radio or you've decided to invest in a good radio upfront, BNF can save money.
Cons:
- Requires Separate Purchases: You need to research and buy a compatible radio and goggles.
- Ensuring Compatibility: You must ensure your radio's protocol (e.g., ExpressLRS) matches the receiver in the BNF drone.
- Slightly More Setup: You'll need to bind the drone and potentially do some basic Betaflight configuration.
Suitable for: Beginners who are ready to invest a bit more in their core equipment (radio, goggles) from the start, or those who want a better quality "FPV drone for beginners" than typically found in RTF kits. Popular BNF options include the Mobula6, Emax Tinyhawk Freestyle, and various small toothpick drones.
The DIY Route: Building Your Dream Machine (and When to Consider It)
What it involves: The DIY approach means buying all individual "FPV drone components explained" (frame, motors, ESCs, flight controller, FPV camera, VTX, receiver, etc.) and assembling them yourself. This typically involves soldering, wiring, and extensive configuration in software like Betaflight. Resources like rotorbuilds.com can be helpful for finding parts lists and build inspiration.
Pros:
- Full Customization: You choose every single component, tailoring the drone exactly to your preferences.
- Deep Understanding of the Craft: Building teaches you how every part works, invaluable for troubleshooting and repairs.
- Repairability: Since you know how it's put together, repairs are often easier and cheaper.
Cons:
- Most Complex: Requires soldering skills, technical knowledge, and significant time investment.
- Troubleshooting Skills Needed: Expect to encounter issues and learn how to fix them.
- Higher Initial Learning Curve: Definitely not an "overwhelm-free" start for most.
Advise for beginners: While incredibly rewarding, the DIY route is generally recommended for those who have gained some experience with RTF or BNF kits and are eager to delve deeper into the technical aspects. For a true beginner, it's typically a later stage in the hobby.
Beyond the Hardware: Crucial Steps Before Takeoff
Getting your gear is just the first step. Before you even think about your "first FPV drone flight," there are vital practices to adopt.
Mastering the Controls with FPV Simulators
This is, without a doubt, the most critical piece of advice for any aspiring FPV pilot. FPV simulators are virtual environments that allow you to practice flying without the risk of damaging your drone. This is the safest and most cost-effective way to "learn FPV flying."
- Why it's crucial: Crashing is an inevitable part of FPV, but simulators allow you to get hundreds of hours of practice without breaking a single propeller.
- Recommendations: Popular FPV simulators include DRL Simulator, Velocidrone, Liftoff, and Uncrashed.
- How to use: Connect your actual FPV radio transmitter to your computer via USB. This ensures you're building muscle memory with the same controls you'll use in real life. Practice consistently until basic maneuvers feel natural.
Understanding LiPo Battery Safety & Charging
LiPo batteries are powerful and lightweight, but they are also volatile. Improper handling can lead to fires.
- Charging: Always use a dedicated LiPo charger with a balance function. Charge in a fire-safe location (e.g., on concrete, inside a LiPo safety bag or ammo can) and never leave batteries unattended while charging.
- Storage: Store LiPo batteries at "storage voltage" (around 3.8V-3.85V per cell) in a cool, dry, fire-safe place.
- Handling: Never puncture, crush, or over-discharge a LiPo battery. If a battery is puffed or damaged, dispose of it safely.
- Disposal: Do not throw LiPo batteries in regular trash. Discharge them completely (e.g., with a salt water bath) and take them to a hazardous waste facility or a battery recycling center.
Navigating FPV Regulations and Best Practices
The world of drones is regulated, and FPV is no exception. It's crucial to understand and adhere to local laws to fly safely and responsibly.
- Local Regulations: Research the drone laws in your country (e.g., FAA in the US, EASA in Europe, DGCA in India). This may include registration requirements for your drone, pilot certification, and specific rules about where and how you can fly.
- Flying Zones: Always check for no-fly zones (NFZs) around airports, military bases, and critical infrastructure. Apps like B4UFLY (US) or local aviation authority websites can help.
- VLOS (Visual Line of Sight): Many regulations require you to maintain visual line of sight with your drone, even when flying FPV. This often means having a spotter who can see the drone and alert you to any hazards.
- Respect Privacy: Be mindful of where you fly and avoid invading people's privacy.
- Safety First: Always check your drone before flight, ensure propellers are clear, and keep a safe distance from people, animals, and property.
Buyer's Guide: Your First FPV Setup Recommendations
So, "what are the essential components of an FPV system" and which specific products should you consider? Here are some recommendations to get you started.
Top RTF Kits for Absolute Beginners
For those looking for the ultimate "best FPV starter kit" that delivers an "overwhelm-free" experience, RTF kits are the way to go. Look for durability and ease of use.
- Eachine Novice-III: A popular choice offering a complete kit with a durable 2-3S Tiny Whoop-style drone, basic box goggles, and a radio. It's a fantastic entry point for indoor and calm outdoor flying.
- BetaFPV Cetus X / Cetus Pro Kit: BetaFPV offers excellent beginner-friendly RTF kits with durable brushed or brushless drones, decent box goggles, and a comfortable radio. They often come with a charging board for multiple batteries.
These kits typically cost between $150-$300 and are ideal for learning the basics without significant investment.
Recommended BNF Drones for Seamless Integration
If you're willing to invest in a better radio and goggles separately, these BNF options provide a step up in performance and durability for "FPV drone for beginners."
- Happymodel Mobula6 / Mobula7: These are iconic 1S Tiny Whoops (65mm/75mm) known for their flight performance and durability. Perfect for indoor acrobatics and gentle outdoor cruising. The Mobula6 is a particularly good "FPV drone for beginners" if you want a small, forgiving platform.
- Emax Tinyhawk Freestyle II / III: A fantastic 2S toothpick-style drone that's great for outdoor freestyle flying. It's relatively robust and offers a good balance of power and control for beginners transitioning from simulators.
- GEPRC TinyGO / GEPRC Skip3 HD: These are slightly more premium options, often available in digital HD versions, offering excellent flight characteristics and build quality for their size.
When choosing a BNF, always double-check the receiver protocol (e.g., ELRS, FrSky) to ensure it's compatible with your chosen radio. These drones typically range from $100-$200 (drone only).
What to Look for in Beginner FPV Goggles & Radios
Investing in quality peripherals early on can save you money in the long run.
- FPV Goggles:
- Budget Box Goggles: Eachine EV800D or Skyzone Cobra X. These offer a great bang for your buck with decent screens and often built-in DVR (Digital Video Recorder) to record your flights. Price: $80-$150.
- Mid-Range Analog: FatShark Recon HD (despite the "HD" in the name, it's an analog goggle with a good screen). Price: $200-$300.
- Digital (Higher Budget): If your budget allows and you want the best image quality, the DJI Goggles 2 / Integra or Walksnail Avatar HD Goggles X are top-tier options, but significantly more expensive. Price: $400-$600+.
- Radio Transmitters:
- Entry-Level/Compact: Radiomaster Zorro or Jumper T-Pro. These are compact, feature-rich radios with hall effect gimbals and multi-protocol support (often with an external ExpressLRS module), making them excellent choices. Price: $100-$150.
- Full-Size: Radiomaster TX16S MkII. A more traditional, larger radio with a full-size screen and excellent gimbals. It's a fantastic long-term investment. Price: $200-$300.
Always opt for a radio with ExpressLRS (ELRS) if possible, either built-in or via an external module. Its performance and community support are unmatched for beginners and pros alike.
Budgeting for Your FPV Adventure
"How much does a beginner FPV setup cost?" This is a common question, and the answer varies widely depending on your chosen entry point and desired quality.
- RTF Kit (Absolute Minimum): You can start with a basic RTF kit for around $150 - $300. This gets you everything, but components might be basic.
- BNF Drone + Separate Radio & Goggles (Good Entry): This is often the recommended path for a balance of quality and cost-effectiveness.
- Good Entry-Level Radio (e.g., Radiomaster Zorro ELRS): $120
- Good Entry-Level Box Goggles (e.g., Eachine EV800D): $100
- Durable BNF Drone (e.g., Mobula6 or Tinyhawk Freestyle): $100 - $150
- Batteries & Charger: $50 - $100
- Total: ~$370 - $470
- Basic DIY Setup (More Advanced Entry): This can vary hugely, but a simple 3-inch or 5-inch build might start around $300 - $500 for components alone, plus the cost of a radio, goggles, and tools (soldering iron, multimeter, etc.). This makes it a significantly higher initial investment in both time and money for a beginner.
Remember, this is an initial investment. You'll also need spare propellers, potentially some basic tools, and maybe a few extra batteries.
Frequently Asked Questions About Starting FPV
How much does a beginner FPV setup cost?
As detailed above, a complete beginner FPV setup can range from $150 for a very basic RTF kit to $400-$500 for a solid BNF setup with separate, higher-quality radio and goggles. If you aim for a digital FPV system, the cost will easily push past $600-$800 for the core gear. Quality and features directly correlate with price.
Can I learn FPV without crashing?
No, crashing is an inherent part of learning FPV flying. However, FPV simulators drastically reduce the number of real-world crashes and the associated costs of repairs. Think of simulators as your virtual crash test dummy. Start with durable, smaller drones like Tiny Whoops, which can often bounce back from impacts with minimal damage.
What's the difference between analog and digital FPV?
The main difference lies in video quality and cost.
- Analog FPV: Offers a live, low-latency, but grainy, lower-resolution video feed that can suffer from static interference. It's generally much more affordable for goggles and VTXs, making it a popular entry point for "cheap FPV setup."
- Digital FPV: Provides a crisp, high-definition, high-resolution video feed with significantly better clarity and color. Systems like DJI's or Walksnail's offer an incredible visual experience but come at a much higher price point and can sometimes have slightly higher latency, though this is constantly improving. For beginners, analog is often recommended due to its lower cost and robust signal in many environments, allowing you to focus on flying skills.
How long does it take to learn FPV flying?
The time it takes to "learn FPV flying" varies greatly from person to person. With consistent simulator practice (30-60 minutes daily), most individuals can learn basic maneuvers (hovering, gentle turns, forward flight) within a few weeks. Mastering advanced tricks and feeling truly comfortable flying in various environments can take months or even years of dedicated practice. Patience and persistence are key!
Your FPV Adventure Awaits!
Starting FPV doesn't have to be overwhelming. By understanding the core components, choosing the right entry point (whether it's an RTF kit, a BNF drone with your preferred radio and goggles, or eventually a DIY build), and prioritizing simulator practice and safety, you're well on your way to experiencing the incredible thrill of first-person flight. The FPV community is vast and welcoming, ready to support you on your journey.
Ready to take the plunge? Explore our recommended FPV beginner setup kits and start your immersive FPV adventure today!
Copyright-safe media generated locally by FPVLovers